So me and Craig Stockden from flyloops.net attempted our first fly-tying clip. I manned the vice and he played camera man. We started of with an easy pattern the Mercury Brassie featured in one of my favorite books Tying and Fishing Tailwater Flies by Pat Dorsey
Monday 8 October 2012
Wednesday 26 September 2012
Vaal River - Heritage Day
So myself, Craig Stockden and Jeandre van Schalkwyk decided to head down to the Vaal River near Potchefstroom to do some early season flyfishing for Smallmouth Yellowfish, or that was the plan.... What unfolded during the day was not what we expected or hoped for, that is fishing for you!
As we arrived at the venue we headed up to the pool above the rapids, fish where surfacing everywhere and we got all excited! We quickly rigged up and head down to the water! The fish where taking caddis adults that where emerging, we noticed two different species small white caddis and a dark brown caddis. Craig managed on hook-up in this period, unfortunately his tippet parted!Jeandre fished below and in the rapids with no success!
I decided to fish on the other side of the island in a deeper flowing rapid. I made my way across the rapid towards the opposite river bank and noticed some Sharptooth Catfish in the shallows. I changed to a 1x tippet and tied on the biggest fly that I had on me, a Red Eye Damsel, and selected a school of fish to target. I slapped the fly a few times near them and one catfish turned around and grabbed the fly. After a short fight the fish was safely in the net and I immediately phoned the other two to come and join me.
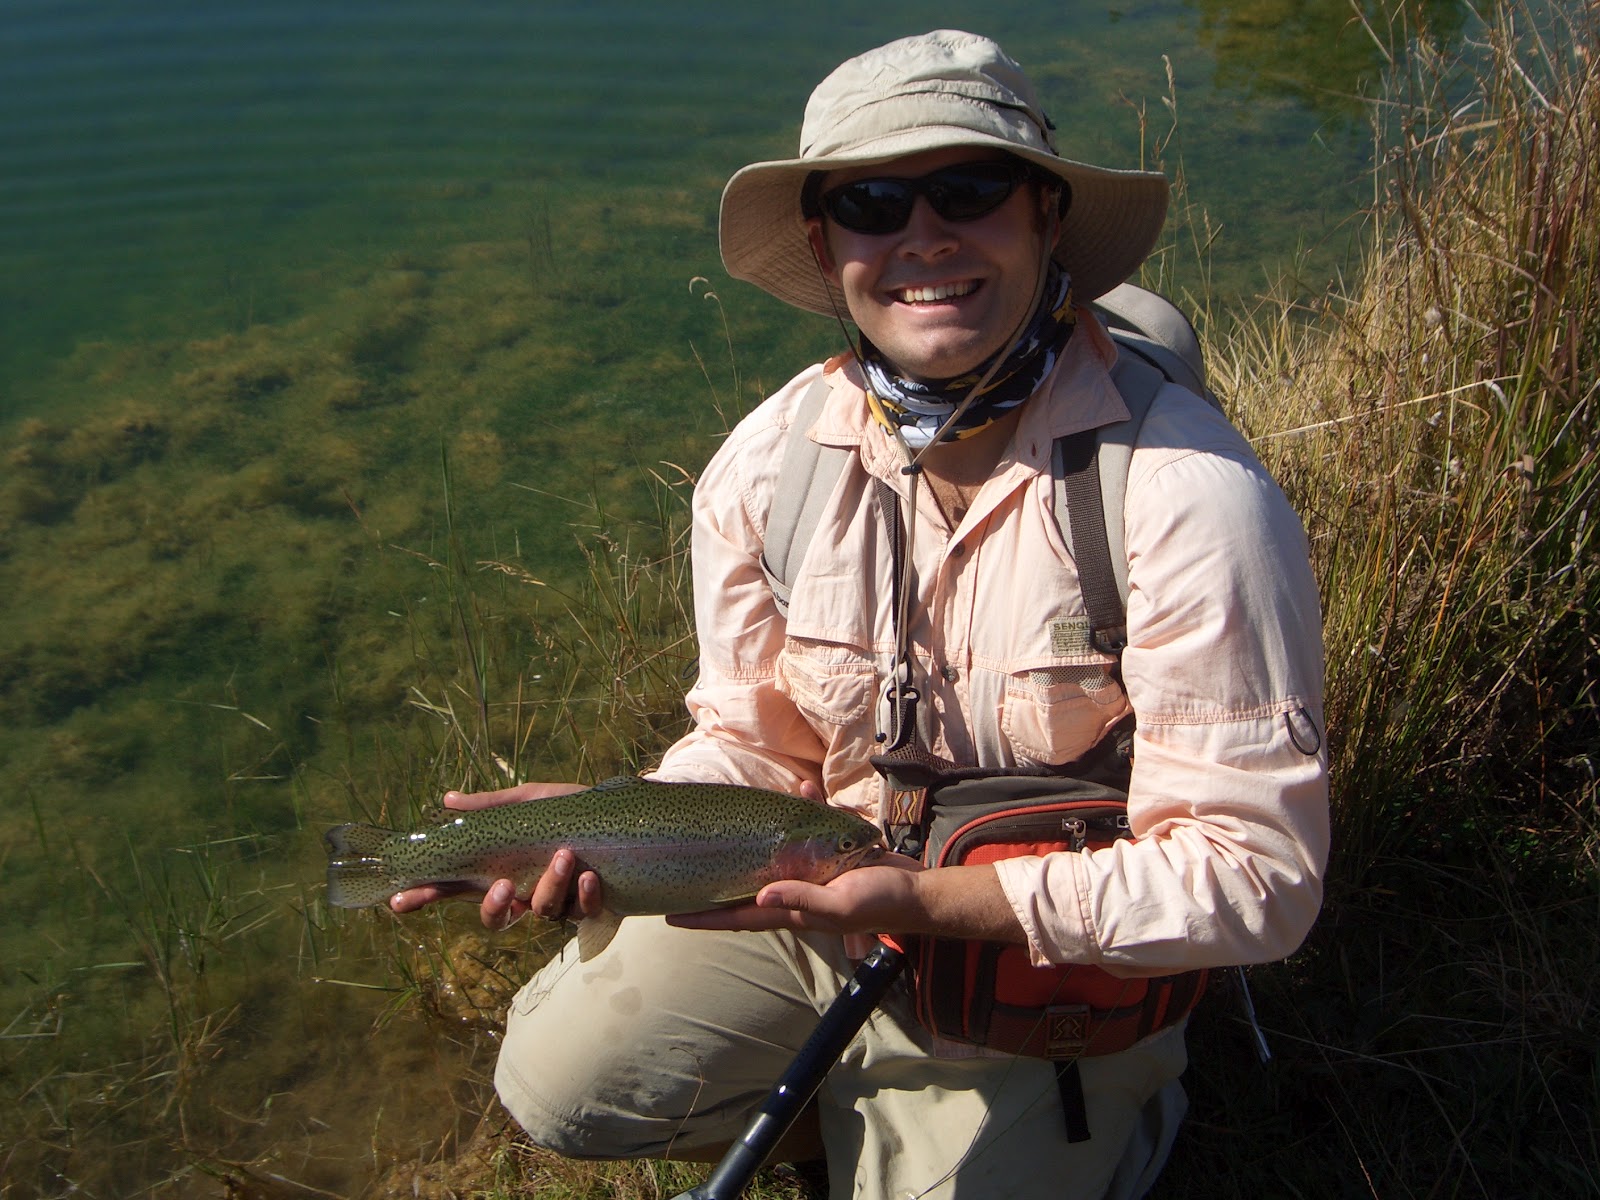
 |
| First fish for the day! |
About 5 minutes later I was into my next fish, this one gave me a good bend in my new Sage One five weight, although it was no match for the serious backbone of this rod and after about 2 minutes the fish was in the net. Craig and Jeandre showed up just as I netted the fish and I could take a better photo of the fish.
 |
| The Upgrade |
We continued to fish with little success and eventually Craig managed to hook a smaller catfish with a Black and Red Woolly bugger.
 |
| Craig with a Baby Catfish |
After this fish we couldn't manage to get any catfish to take our flies and we decided to call it a day! Hopefully on our next outing the gold bars will give us a showing!
Sunday 5 August 2012
K-WAY Hydro Vent 20 Day Pack - On Promotion at Cape Union Mart Sale

So I thought I would share this
bargain buy I got over the weekend. A K-WAY Hydro Vent 20 Day Pack that on promotion for R275.00 (normally R500) at Cape Union Mart. They have a SALE on from 27 July to 19 August. They have the GoPro HD Hero Naked also on sale for R2299.00. Sale items can be bought online and items R250 and over get free delivery!
 |
| I got the orange bag, they are also available in blue and red |
I bought it with the idea of
using it for fly-fishing on mostly the Vaal River
 |
| The pack sits high on your back to keep dry during wading |
Tech Specs:
Volume: 17 + 3 litres
Size: 32 x 14.5 x 44cm
Weight: 1.038kg
Material: 420D Diamond ripstop PU Coated,
600D PU coated
Special features:
- Hydration system compatible
- Raincover at bottom
- Breathable backing system
- Expandable volume
- 2 mesh pockets
Some of these special features I
find quite useful for a fly fishing outing. A hydration bladder can be inserted
and is nice to have to keep hydrated during a hike on a small stream or a hot
day on the Vaal . If you are not a fan of a
hydration bladder two water bottles can be inserted in the mesh pockets on each
side.
The breathable backing system is
one of the features that I look for in a back pack and helps to keep you cool,
especially if you wear a moisture control shirt.
The bag has a pocket at the front
with mesh compartments ideal for small fly boxes, tippet, leaders or whatever
you would need on a day outing on a river. The top pocket has further space for
similar items or maybe a small camera, mobile phone etc (waterproof camera or a
camera/phone in a dry bag). The main compartment has a lot of space for any
larger objects such an extra reel, jacket, extra water bottles, food etc.
On the strap there is some space
to clip on a variety of items such as nets, pliers, floatant and as you will
see from the photo below a fly-fishing chest pack (the chest pack is an Xplorer Pesca Chest pack)
 |
| A chest pack can be clipped onto the back pack |
 |
| The chest pack combined with the back pack |
A chest pack will make it easier
to change flies, rigs etc if you like experimenting or adapting fast to
changing fishing conditions. On most occasions I will only use the back pack
with a fly fishing shirt. In the one shirt pocket I will have a small fly box
with a selection of dry flies, nymphs and a streamer or 2. In the other pocket
I will have a few tippet options and items such as floatants etc.
I hope this gives you a different
perspective on a back pack and an alternative option to the variety of fly
vests and packs out there. And for R275.00 it is quite a bargain!
Wednesday 1 August 2012
Flyloops.net - Flyfishing mobile app

The flyloops.net mobile app has been specifically designed by flyfishers for flyfishing addicts.
The app gives you the ability to record your flyfishing as it happens, in real-time, by allowing you to take photos of your catches and upload them to your profile.
The geocoding features capture your location and seamlessly plots your catches in relation to other flyfishers who have fished nearby.
Other key features include:
Visit Flyloops.net to download the app: Blackberry App World
Tuesday 5 June 2012
Fundamental Flytying “Tackle the Hackle” with Gordon van der Spuy
In this fly tying DVD, a first of a series, Gordon van der Spuy and Charles Stewart explore the fundamental techniques and materials necessary to tie some well known and effective fly patterns.
.jpg) Enjoy this easy to follow DVD, made for fly tiers by fly tiers, and be taken on an entertaining and insightful journey into this fantastic world of feather craft. The DVD covers the following fly patterns in 90 minutes:
• Dragon Fly Nymph
Enjoy this easy to follow DVD, made for fly tiers by fly tiers, and be taken on an entertaining and insightful journey into this fantastic world of feather craft. The DVD covers the following fly patterns in 90 minutes:
• Dragon Fly Nymph
• Pheasant Tailed Nymph (PTN)
• Woolly Bugger
• Dubbed Mayfly Nymph
• Adams
• Spent Spinner
• Klinkhammer
• DDD (Duckworth’s Dargle Delight)
The techniques covered in the DVD will leave you well armed to tackle most basic fly tying patterns needed to tie and fish your own flies.
Please see my full review at: Flyloops.net
Saturday 2 June 2012
Stonecutters Lodge
Saturday, 2 June 2012
Early on Saturday morning we departed from Johannesburg towards Dullstroom for a relaxing weekend at Stonecutter Lodge. On our arrival we where greeted by Margi Butler, one of the owner, and soon afterwards we joined her at the Stone Manor for a scrumptious breakfast.
After breakfast we decided to walk around and explore all the waters while we waited for a cottage to come available. The river looked promising and I could not wait to get cracking. We passed by the small dam and spotted quite a few fish hanging out in the shallows. This got us excited and I told my girlfriend that we will start at the small dam just to open the account for the weekend. We headed to the bigger dam and spotted a fish under the jetty and a few cruising in the lanes between the grass. Quite a few rises where also taking place in the middle of the dam, not surprise as people where fishing from the bank and probably spooking the fish.
We headed back to our car and the staff said we can occupy one of the Cobbles units. After unpacking we quickly got our rods ready two for my girlfriend for the dam and my 3 weight set-up for the river. Arriving at the small dam I spotted a small Rainbow in the corner of the dam and directed my girlfriend where to cast. The fish was not interested in her offering and she headed down to the bigger dam. I presented a Puterbaugh Caddis to the same fish and after a few twitches got him to take it!
I joined my girlfriend at the dam and explained to her how to fish a Papa Roach. During this process I spotted a Rainbow cruising towards us and luckily the fly was still in the water. I gave the fly one quick twitch and the fish jumped on it! This opened my account for the dam and I decided to leave my girlfriend to fish the river.
 |
| The cruiser caught on a Papa Roach |
 |
| The close-up |
 |
| Nice pink cheek! |
My girlfriend phoned me and she is joining me on the river as she was struggling to hook fish in the dam. I switched to a Spietkop (black woolly bugger with blue flash) and decided to fish the deeper pools on a long leader. I must admit this is not my favourite technique to use in a river, but I was quite desperate! When I got to the pool at the two umbrellas I got an energetic take on the fly! After a very frantic fight I landed the fish in the end of the pool. My girlfriend was just in time to take a photo and decided to give her a try on the pools on the way back to the dams!
 |
| First fish in the river safely in the net! |
 |
| The strong little fighter |
 |
| Interesting colouration on this fish! |
We fished our way back towards the dams with no success until we reached the pool at the access gate. I showed my girlfriend a spot where is saw some fish rising earlier and on her third cast she quite her first fish in the river. A managed to stuff up the photo where after the fish wriggled out her hands straight into the river.
 |
| A good example of how to stuff up a photo! |
On our arrival at the dam there where a few people fishing the dam with no success. I reckon they where just causing to much commotion with all the bad casting that most fish where holding to towards the middle of the dam. As the sun was setting people where leaving the dam until it was only me and the local guide on the dam. I noticed that fish where striking short on my Papa Roach and decided to trail a San Juan Worm behind it. On the next cast I hooked into a feisty little fish that gave a good acrobatic display.
 |
| Fish on a San Juan worm |
 |
| First fish on the tadpole! |
 |
| Second fish on the tadpole! |
 |
| Perfect ending to the day! |
Sunday, 3 June 2012
Early the Sunday morning I decided to fish the large dam before breakfast. With it being the perfect time of day to take photos I decided to take some of the large dam.
 |
| Left side of the dam at inlet |
 |
| Middel section of the dam where most fish where holding! |
 |
| Right hand side of the dam |
 |
| Full view of the dam at sunrise |
After my photos session I decided to fish a White Death with a fat retrieve under the surface and soon afterwards had my first fish before sunrise.This was followed with another few fish in quick succession.
 |
| First fish of the day! |
 |
| Another average one before breakfast |
 |
| The close-up |
 |
| Another fish that fell to a White Death |
 |
| The close-up |
 |
| My girlfriend's first fish on the dam |
After breakfast I headed down to the river for a quick session before our trip back to the city. I managed to catch a fish straight away on an olive woolly bugger at the same spot where my girlfriend caught her fish the previous day! I headed down stream and switched to a small epoxy baitfish. I noticed a fish rising behind a log in a slow flow and made a cast towards it. The fish hit the fly very hard and headed down stream. It turned around and wrapped itself around a log where after the leader parted. I was so disappointed as it looked like a very nice fish!
 |
| Nice fish out the river |
 |
| Another on at the two umbrellas |
 |
| The third fish at the two umbrellas |
 |
| A feisty river fish on a Salty Bugger... |
 |
| The close-up |
A map of the weekend events:
View Stonecutters Lodge in a larger map
Please also see my review of Stonecutters Lodge at: Flyloops.net
Monday 28 May 2012
Tube Bass Popper – Home Made Edition
Introduction
This is my first attempt at a
tube fly and I used materials lying around in my house. The main materials are
a cork from a port bottle and an old pen cartridge. This tying sequence is just a basic idea of a
tube popper and probably not the most correct way to tie a tube fly. It
basically just gives you some ideas regarding the materials you can use for a
fly like this and how easy it is to tie it. I hope this inspires you to try
this alternative method of fly tying and also see odds and ends lying around in
your house in a different light.
Tube flies have various
advantages such as:
- Various types of hooks can be used with one fly
- The fly can be used with or without a wire trace
- Often the fly will slide up the line once a fish is hooked and then the fish cant bite down on it
- Another advantage is that the fish will only be left with a hook in the event of line failure
Materials:
1. SF Flash Blend - Bleeding Black (Alternatives:
Bucktail, Marabou, Zonker Strip etc)
2. Crystal
Flash
3. Crystal
Chenille or Dubbing
4. Saddle
Hackle
5. Rubber
Legs
6. Stick-on
Eyes
7. Marker
Pen
8. Nail
Varnish
9. Sally
Hansen – Hard as Nails ( Ideally epoxy should be used)
10. Superglue
11. Wine Cork or Foam Popping Head
12. Any
material suitable as a tube – I used an old pen ink cartridge
13. 6/0 Thread
 |
| Materials |
 |
| Cork and Pen Ink Cartridge |
Step 1:
Color the cork with a permanent market to act as a base
layer for the nail varnish

Step 2:
Form a hole in the middle of the cork with a fly tying
needle, then insert the tube trough the cork

Step 3-4:
Apply some superglue on the tube and push cork further up
the tube
 |
| Step 3 |
 |
| Step 4 |
Paint the cork with nail varnish using long strokes

Step 6:
Leave the nail varnish to dry for approximately 20 min

Step 7:
Superglue eyes to both side of the cork and leave to dry for
approximately 3 min

Step 8 and 9:
Paint a layer of Sally Hansen or ideally epoxy over the cork
and leave to dry (the Sally Hansen will take around 20min the epoxy will take
longer)
 |
| Step 8 |
 |
| Step 9 |
Step 10:
Cut shallow slits into the tube material to prevent your
thread slipping on the tube

Step 11:
Add a base layer of thread onto the tube

Step 12:
Pinch wrap the SF material and secure with a few wraps

Step 13:
Pinch wrap some flash material and secure with a few wraps

Step 14:
Select two saddle hackle feather, pinch wrap the on both
sides of the tube and secure with a few wraps

Step 15:
Take another saddle hackle feather and hold it with the
shiny side facing you. Pinch wrap the feather to the tube and secure with a few
wraps

Step 16:
Take two round rubber legs, pinch wrap it and secure with
about 3 wraps

Step 17:
Turn the legs perpendicular to the tube and secure it
further with figure of eight wraps

Step 18:
Wrap the legs in front of the cork and tie in some crystal
chenille.

Step 19:
Wrap the chenille forward towards the legs and secure with
two wraps

Step 20:
Wind the hackle over the chenille and secure in front of the
legs with a few wraps

Step 21:
Figure of eight wrap the chenille over the legs and finish
of with another few chenille wraps in front of the legs. Secure the chenille
with a few thread wraps and finish of the fly by whip finishing the thread
behind the cork.

Trimming:
Step 1:
Trim the SF and flash to the same length of the saddle
hackles

Step 2:
Trim the legs to three quarters of the length of the tail.

 |
| Leg Trimming Result |
Step 3:
Cut the tube behind the tail to around 5mm

Cut the tube as close as possible to the cork

Final Result:
 |
| Top View |
 |
| Side-on View |
Rigging:
Step 1:
Slide the tube fly and a carp rig rubber sleeve onto the
line and tie your choice of hook to the line

Step 2:
Slide the rubber sleeve over the hook

Step 3:
Slide the tube into the sleeve

Subscribe to:
Posts (Atom)